My twins are turning one! I wanted to spread the celebration with 20% off all patterns! Just released yeti and bigfoot plush too! Use code TURNINGONE, for your discount. Expires end of the month!
For my twins, I just had to create some twin specific outfits. I had a tricky time deciding what to make and worrying about the size. I knew twins were typically born smaller, but didn’t want to make the outfits too small or two big. I ended up deciding to only make one outfit (for an 5-8lb baby, typical newborn size) and two sets of wraps with headbands. Here is how they turned out! They can all be purchased on Ravelry or Etsy.
Hard to see in the picture, but this is my butterfly wrap, with two little tie back lace headbands. Buy here.
Shells and pearls headbands with wraps, see on Etsy here.
Last (and my favorite) outfit, with a matching bonnet, open back romper, and headband set! See on Ravelry here.
I just adore newborn photos! I am pretty excited for the 3 month outfits I am currently making them!
Hello Everyone!
It has been a while since I have posted, since I am getting used to life with newborn twins! I wanted to create something, with yarn, that was a little different than my usual items, could hang on the wall, and baby friendly. I decided to purchase a latch hook kit, to fit my underwater theme!
I had to add in my little twins (just two weeks old!) and their plush whales too! You can see the pattern for the orca here and the humpback whale here. Also, the amazing twin pillow they are sitting on is called the Twin Z pillow and I love it! You can purchase one through my affiliate link below (doesn’t charge you any extra, but I get a small percentage) . 🙂 Now back to the latch hook border!
It took me a while, but I am finally finished with my humpback whale plush toy and baby blanket! This is the second set, to go with the matching orca blanket and plush for my little twin girls. Here is a picture of the plush and blanket together. 🙂
I am pretty happy with how it turned out! The reason that it took me so long, is that I couldn’t decide how to create the plush toy. I started working in the round, but then didn’t want to just sew white patches on. Tried working with changing color each round, but it started to get complicated and not line up correctly. Consequently, I ended up with a combination of working in the round and then rows. The white part is sewn to the charcoal grey, but not on top. The pieces are created as two seperate parts and sewn together. You can get the pattern for the plush toy here.
Over Christmas I took the train down to Oregon, to spend some time with family and decided to have a crafty Christmas! I originally planned to crochet a few baby mobiles, for my little twins, but I started to worry that I was going to run out of time! Time seems to be flying! I can’t believe I was already 24 weeks along for Christmas. I still have their hospital hats, newborn photo props, and more plush toys to crochet! Consequently, I recruited my parent’s help in making a spiral butterfly mobile out of simple scrapbook paper. I wanted a simple and sweet mobile to hang over their changing table, in hopes that it will be a good distraction for all of those upcoming diaper changes. 🙂
I wasn’t quite sure how to make the mobile when I started, so I will do my best to explain the process.
I have so much to be thankful for this year! I hope everyone had a great Thanksgiving!
Amanda
I have been seeing more and more C2C (corner to corner) crochet graphgans and I decided it was finally time to make one of my own! I have never been a fan of creating blankets and just never seem to have the patience for them, so this type of blanket seemed more up to speed for me! Also, with my little twins on the way, I have extra motivation to create some baby blankets! I honestly wasn’t sure how, so I started looking up some videos, created my own graph, and I am glad that I did! I am sure there is an easy online way to create your own graph/chart to follow, but I decide to start with just drawling my own. Plus, I didn’t want to accidentally violate somebody’s copyright, by taking their picture.
Not too long ago we found out we were pregnant, with twins! We are beyond excited and of course, had to add some crochet additions to our pictures. I decided, for the first trimester I would crochet little fruit, to document some of the weeks. According to different pregnancy books and websites, I came up with the approximate length the babies should be at each week and the corresponding fruit.
Materials:
All fruit use:
Worsted Weight Yarn #4 – Colors Below.
‘E’/3.5mm Crochet Hook
Tapestry Needle
Poly-Fil Stuffing
Stitch Marker
Lime: Vanna’s Choice in Kelly Green (approx 10 yards)
Plum: Vanna’s Choice in Purple (approx 18 yards) and Vanna’s Choice in Kelly Green (approx 2 yards)
Lemon: Red Heart with Love in Daffodil (approx 20 yards)
Peach: Caron Simply Soft in Persimmon (approx 30 yards)
I am excited to announce that we are having twins! Since it’s Fall, I just had to have crochet little pumpkins in our announcement!
Now, on to the pattern!
Hello!
Over the years I have had several testers try out my patterns, but I usually find people through Ravelry or Etsy. I decided it was time to have a running list of people I can contact when I have a new pattern, that needs to be tested. 🙂
Qualifications:
All that you need to know is the basics of crocheting, which will vary a little bit for each pattern! I would love to have people of all skill levels! You will have to commit to creating the pattern in the time frame that we decide on (I am flexible), follow all of my instructions (you can change colors), be willing to tell me any problems (typos, confusing areas, recommendations, errors), and provide me with a picture of your finished item. I will always provide a list of materials that you need, abbreviations that I use, and stitch descriptions.
How It Works:
Basically, if you decide to be added to my tester list, I will send you an e-mail with a picture of my patterns and any key information that you will need (materials, sizing, etc.). Then, you would let me know if you would like to test out the pattern and the approximate time frame needed to complete the project. Next, I would send you the pattern for free, so that you could make the item and let me know if you find any mistakes, typos, or confusing areas and also a picture of how yours turned out. That’s it!
There is no obligation to want to test every pattern, you can say no. The more mistakes and recommendations you find the better, so feel free to give your honest opinion.
If you are interested in being one of my testers, please let me know!
Currently, I need some testers for my sea turtle basket!
Thanks!
Amanda
Along with my AMK Crochet business, I am a nanny for an adorable little toddler, who is turning two! I started working with her a year ago, when I moved to Seattle. I have been trying to decide what to make her, for her birthday, that would be fun and not take up too much space. Her mom already creates cute clothing (you can see it here) and she has been gifted crochet blankets, from family members. With most of my items being newborn photography props, I needed a new idea! Looking through Pinterest and Etsy, for educational toddlers items, I was reminded of quiet books. The basic idea behind a ‘quiet book’ is to have a handmade book (typically felt/flannel) to entertain children in an educational and fun way, that just so happens to keep them quiet (hopefully). The little girl I nanny for is very smart and has a surprisingly long attention span, so this seemed like a great option for her, especially since she has been traveling a lot lately.
I had never worked with lace yarn and honestly didn’t know much about it! I learned to crochet in a class at Joann Fabric, which is filled with mostly worsted weight acrylic yarn. There is of course other types of yarn, but that was the most popular at my store. Therefore, that is what I always worked with, created patterns with, and taught classes with. It wasn’t till one day that a customer asked me how to adjust my pattern, to be made with mohair yarn. I didn’t really have an answer, I could only guess and give my best estimations. So, I went to my local yarn shop and looked around, asked questions, and bought some baby alpaca and silk blend yarn. I just loved it. I used it to create my favorite shell bonnet hat and wrap (it’s a heavy lace yarn – Cumulus by Fyberspates).
With my wrap and bonnet hat, I wanted it to be very open and lacy. I used a L/8.00 mm crochet hook. From there I wanted to see how it would look with my normal (and favorite Furls hook – affiliate link), size H/5.00 mm crochet hook, so a baby girl dress and headband set was created!
At this point, I really couldn’t stop myself. I ended up ordering more yarn. 🙂 I really fell in love with Debbie Bliss Angel (used above in dress) and Rowan Kidsilk Haze (used in romper below), both of which are a mohair and silk blend.
I figured out basic sizing and my gauge, but wanted to go one step further and try out a plush animal. Using the lace yarn was tricky because I had to use such a tiny hook, so that you couldn’t see the spaces/holes. Therefore, I ended up holding two strands together, to create my little bear plush. Of course, I had to add in a matching sleepy hat for the baby and bear. I have not published this pattern yet, but I will soon! Wanting to try something a little different, I also just created a puff pixie bonnet hat, will be available soon!
As much as I loved working with all of this lace yarn (thinking about making another wrap too), it can be a little tricky for a beginner. The main struggle I had was when I needed to pull out my stitches, sometimes the yarn would snag, catch, and tangle, which made it so hard to pull out. As long as you go slow and pay attention, you should be able to manage frogging your work, but it can still get tangled and stuck. I was also a little off put by the price tag, but it’s so worth it for this soft and halo style lace yarn!
I would love to see what you have created with lace yarn?! Have you ever tried using it? Is there any brand I need to try?
**In the spirit of full disclosure, this is an affiliate link, which means that I may get a commissions if you decide to purchase anything from Furls. I only recommend products that I use and love myself, so I know you’ll be in good hands.**
I wrote this pattern last year and as I am going back and reformatting my patterns, I have decided to retire this one, as a free pattern! I hope you enjoy!
Also, later today and through tomorrow I will be publishing some patterns for sale. A newborn mermaid costume, bird hat with nest/bowl, and an adorable sunflower bonnet hat with cocoon! 🙂
Valentine’s Day is coming up fast, so I thought I would put a little collection together!
I recently published a FREE crochet newborn angel wings with halo, that would be a perfect valentines photo prop.
I also have an adorable little pom-pom hat with diaper cover set that is in 0-3 month and 3-6 month sizing!
Last pattern I have for Valentines day is a heart hat, simple and sweet hat that is in 0-3 months, 3-6 months, and 6-12 months.
If you want a quick and cute Valentine’s day amigurumi heart, head over to Repeat Crafter Me’s page. http://www.repeatcrafterme.com/2016/02/cuddly-crochet-heart.html
Also, if you haven’t signed up to get their newsletters and updates, there is a GORGEOUS Furls hook that is available for only a limited time! Valentine’s Day 2016 special, they are only selling 300 (134 left, last time I looked). Also, free shipping, just use the code: ValentinesHooks. You can get to Furls Site, here. The link is an affiliate link, so I will get a small percentage, if you decide to purchase. 🙂 It’s the black and white ebony hook, under their “limited edition” crochet hooks! If you get one, I would love to see a picture of the design for your hook!
Hope everybody has a fantastic Valentine’s Day!
Amanda
I was thinking about a Valentine’s day outfit that was simple and sweet, which led to the creating of newborn angel wings and halo. Although, I feel as though an angel outfit could be used year round for a newborn, but I love the idea of it for Valentine’s day. Also, it’s great for those parents that don’t know the gender or want more gender neutral outfits.
One of my new goals for the year was to decide on the format for my patterns and do my best to make sure they are all consistent. One year ago, January 2015, I decided that I was going to try out pattern writing and began with a basic half double crochet striped hat. I wanted to create a simple hat with simple color change and have it in all sizes. This is what I ended up with.
I was pretty happy with my first pattern, so decided to continue on. I progress from hats to diaper covers, capes, swaddle sacks/cocoons, amigurumi, and several other newborn outfits. This past year of selling patterns has been great and I have learned a lot! I made the final switch in June, when I moved to Seattle, downsized my yarn collection, and started the switch to only selling my patterns. Over the past year I have switched to more newborn based items, put more focus on getting professional photographers, and now to creating consistency in my patterns.
If you look at my early patterns, such as all of my fuzzy pipsqueak animals, you will see a lot of differences to now and future patterns. A lot of these changes are very new, but I am going to slowly be going back to previous patterns to update. I changed the header, to now be my simple logo, instead of a full banner. That way, if you decide to print the pattern, I will not use up all of your ink. I have changed my abbreviations to match the Craft Yarn Council’s standardized list. The main problems I had, was I put everything in caps, such as “SLST” (slip stitch). The Craft Yarn Council has the abbreviation as “sl st”, so that is what I will be using from now on. Also, I would abbreviate magic circle as “MC”, which the CYC(craft yarn council) has as “main color”. Therefore, you will now be seeing this as a magic ring instead.
I will be continuing to add more photo tutorials to my site, so that I can refer customers here instead of trying to include everything in the pattern. This will make the patterns shorter, more printer friendly, and give easier access to you, for reference. Of course, I will still have plenty of pictures in my patterns, but I want to have the basics such as the magic circle, foundation double crochet, and changing color, all available here for reference.
A lot of the changes are minor, but the best improvement will be with the yardage. I don’t know why I didn’t think it was important to count/calculate the yardage as I was creating my patterns, but I regret it now. This is the part that will take me the longest. I am going back and recreating all of my items, checking the patterns, counting and updating the yardage, along with adding any additional notes that I think will help. I started adding yardage information about half way through the year, but I will update them all as soon as I can.
Of course, if you have a pattern of mine already, I will be more than happy to send you the updated copy. If you purchased a pattern from me on Ravelry, you will get e-mailed the update automatically. I would love to hear what you think of my new pattern layout! Since Easter is coming up, I thought I should go back and update my Easter bunny pattern first. I have finished the updated version of the bunny with diaper cover tonight and will be doing the Easter bunny with cape next!
Also, I have added two new patterns, with my new format. A newborn raccoon hat with unattached tail and a newborn sloth hat.
Up next, will be my next free pattern, newborn angel wings and halo! I have just finished creating the pattern and I am hoping to hear back from the photographer soon, with her adorable photos. Mine… are not the best.
However, if I don’t hear back by tomorrow, I will get the pattern ready to publish with mine. That way you can have time to create it before Valentine’s day.
Thanks for reading!
I am always looking for more crochet tips and tricks, so I decided to try out some classes on Craftsy.com. I started selling my crochet patterns on Craftsy a few months back, but had yet to take any of their crocheting classes (I did take a free knife skills class that I enjoyed though). I figured it was time to try them out! I also wanted to be able to give recommendations, reviews, and links to some of their videos. This led to me signing up for an affiliate link account. Basically, this means that if you click on a link that I share from Craftsy.com and buy something, I will receive a percentage, for referring you. As part of the program, Craftsy gave me two free classes! I choose to take the ‘Crochet Techniques Toolkit’ and ‘Mastering Foundation Crochet Stitches’. If you want to see everything these classes have to offer, you can click the banner below.
**In the spirit of full disclosure, this is an affiliate link, which means that I may get a commissions if you decide to purchase anything from Craftsy. I only recommend products & systems that I use and love myself, so I know you’ll be in good hands.**
To start, I am not a huge fan of ads and I don’t want to have a website that has a ton of pop-ups or any of the frustrating adds that don’t go away. That is why I am signing up for specific affiliate programs, of products that I use and enjoy. I have been interested in Google AdSense and am trying it out. You will see these ads only on the right hand side of my page and at the very bottom. I do not want extra, non-relevant adds to get in the way of my content. I will be signing up for ads from Furls crochet hooks too, which I love! You will see them in so many of my patterns and photo tutorials!
Now, back to the Craftsy classes. I choose the ‘Crochet Techniques Toolkit’ class because it includes a little bit of everything:
I have not watched all of the class yet, but so far I am a fan! I already have photo tutorials posted about how to create the foundation single crochet and foundation double crochet, but this video has a great video for each, which can be easier to follow, than my pictures. I really wish I knew about the foundation slip stitch before, I guess I just never thought to try it! Speaking of foundation stitches, that was the next class I took, ‘Mastering Foundation Crochet Stitches’. The reason I wanted to take this class is simple, I hate chaining to start a project. Any new method of starting a project is always a favorite for me. I had never thought of all of the methods and stitches you can use. You might see one of these methods in an upcoming pattern. 🙂
My favorite part of using Craftsy is that you can skip around and view what you want and you have unlimited access! That means, I can come back any time and re-watch any part I want. It is always good to have a reference for a refresher or trying something new. Also, even though it is an online class, there a running chat off to the side, where you can ask questions and post the projects that you have created. I love how easy the videos are to follow and that they are created by pros. Sometimes searching around online and at YouTube you find videos that make things more confusing and could be incorrect. Craftsy gives you a place to get all the information, ask for help, and know that you are learning the correct way. Also, I am a big fan of being able to watch the videos on my phone, though their app, which is great for when I am crocheting while out of the house.
I am really considering the crochet cables class next. I have the hardest time working with cables and I think a video would definitely help!
Let me know how it goes or you if have already taken a class, what did you think?? I would love to hear your opinion of Craftsy and their classes!
For my sister’s birthday, she wanted a baby tortoise. Her husband ended up getting her two and they came up with the names of Princess Peach and Bowser. Of course, I had to try to make each of them a cozy, to match their names. I don’t know much about tortoises, so I started searching around online and found an Etsy store that sells turtle cozies. The shop is currently on break, but there are links to other Etsy shops that sell them. You can see them here. Taking a look though her sold orders, you can see some adorable outfits. Although, I had the problem of my sister’s tortoises being babies and since she lives in Texas and I live in Washington, I can’t just go try them on. I was clueless on sizing and measurements, so I went off of measurements in the photos she sent over.
I love the foundation single crochet for the same reasons that I love the foundation double crochet. It is a great way to start a project, so that it will have a cleaner look and more stretch, compared to starting with a chain. I was making a turtle cozy for my sister’s new baby tortoises and wanted the band around the tortoise to have as much stretch as possible, so that it will fit for longer, which brought about this hot pink tutorial. The tortoise cozy is an odd, but fun project that you can get the free pattern for, here.
I am in the process of making a bit of a switch. I was using wordpress.com to start my blog, but then decided to make the switch to being self-hosted. I really wanted to opportunity to customize my site a little more and to start selling my crochet patterns, on my own site. I love Etsy, Ravelry, and Craftys, but I really like the idea of having everything in one site, owned by me. I will continue to sell my pattern on all of the sites and the prices will remain the same for all sites, so you can choose the best site for you, to purchase though. For those that have been to my website before, you will see me slowly re-adding all of my previous posts and continuing to add my patterns for sale. For those that are new, welcome! Due to the move of my website you might find some links that don’t work or haven’t been updated yet. I am working as fast as I can to make sure everything is updated and easier for you to find! 🙂 If you find something that I have missed, please feel free to e-mail me or leave a comment. I apologize for those that are in the EU’s VAT area, I do not yet have everything set up to file/pay the VAT, here on my own site. However, all of my patterns are still available to you on Etsy, Ravelry, and Craftys.
I have big plans for 2016 and can’t wait to show all of my photo tutorials and new items, free and for sale! I am also working with a new photographer, so I can have adorable little newborns model my items. I am always looking for new photographers, crochet pattern testers, and suggestions/ideas! Please let me know if you would like to see a specific photo tutorial or have a great idea for a crochet pattern.
Happy New Year!
Amanda
Bernat Pipsqueak yarn is a super soft, bulky weight (size 5) yarn, that comes in several fun colors. I love how soft it is and use it for several of my newborn outfits. I have had a lot of people ask me how hard Bernat Pipsqueak yarn is to work with and I honestly don’t have a great answer for that. It really varies from person to person, but there is the benefit of the fuzz hiding mistakes. 🙂 The problem with this fuzzy yarn is that you really can’t see the stitches, so you have to go more off of how it feels and almost just know where the next stitch goes. However, once you get the hang of it, it works up quickly for some fun baby items. I highly recommend counting your stitches each row! It definitely gets easier the more you work with it though, which brought about this free pattern. This way you can give the yarn a try, while making an adorable bear hat. Then, if you want to try another, you can head over to my ‘patterns for sale’ section and I just published another free pattern in pipsqueak yarn!
This is my second free bear hat. The first free pattern I used bulky weight pipsqueak yarn, so I am using worsted weight yarn for this one. 🙂 To get my first free pattern, click here. I wanted this hat to be a little bit different, so I decided to use front post and back post double crochet, for some ribbed texture.
My last post was about starting with the magic circle for several items, such as the hat, fish, fishing poll, and reel. Now, I am going to show you how to start the pants and create the suspenders, with the foundation double crochet.
The foundation double crochet, typically abbreviated fdc, it essentially creating your chains and a row of double crochet (dc) stitches, at the same time. The reason that I recommend using the foundation double crochet is because it gives you so much more stretch, than using a chain foundation, which is great for the waist band of pants. Also, in cases such as the suspenders, it makes the row look more even and consistent, compared to starting with chaining. I did not create this technique, but have found how useful it is and wanted to share!
Working around the front and back post double crochet is great for providing some texture to any project! I love creating the ribbed stitches, by working around the post for multiple rows, for a fun and stretchy look. I have been using post stitches a lot lately for my alligator (creating spikes on the back/tail), pants waist band, and bear hat. Just remember that it makes your rows of double crochet a little bit shorter! You can always work around the post for other stitches, but the double crochet is the most popular.
After making my newborn snowman cocoon and hat I really wanted to make another snowman item! I wanted to make something for more than just newborns and ended up with making a little ornament. This way it can be a simple decoration for winter, on the Christmas tree, or for your new baby’s first Christmas. I was originally going to have the ornament match my newborn set, but I thought a little more neutral might be better. I just love the photo that Michele took for me though!
I am currently working on a newborn fisherman outfit/photo prop and thought that I should show what I am doing, as I go. I love the magic ring and use it anytime I can! It is my favorite way to start a project, especially hats. 🙂 The reason that I prefer the magic ring to other methods is because it is very adjustable. You can make the ring as large or as small as you would like and can use it with any stitch. For example, in my fisherman pattern, I use the magic ring to start my hat, little fish, fishing pole, bobber, and my fishing reel! Of course this method only works, if you are working in the round, which is why my next post will be about starting with a foundation double crochet (FDC), for my little fisherman pants and suspenders.
I am currently working on my aviator hat and plane plush pattern, which made me think of creating a post about changing color! As you can see below, I wanted to change color mid row for my plane front window and the nose of the plane with as clean of a look as possible. Luckily this is a very easy technique. 🙂
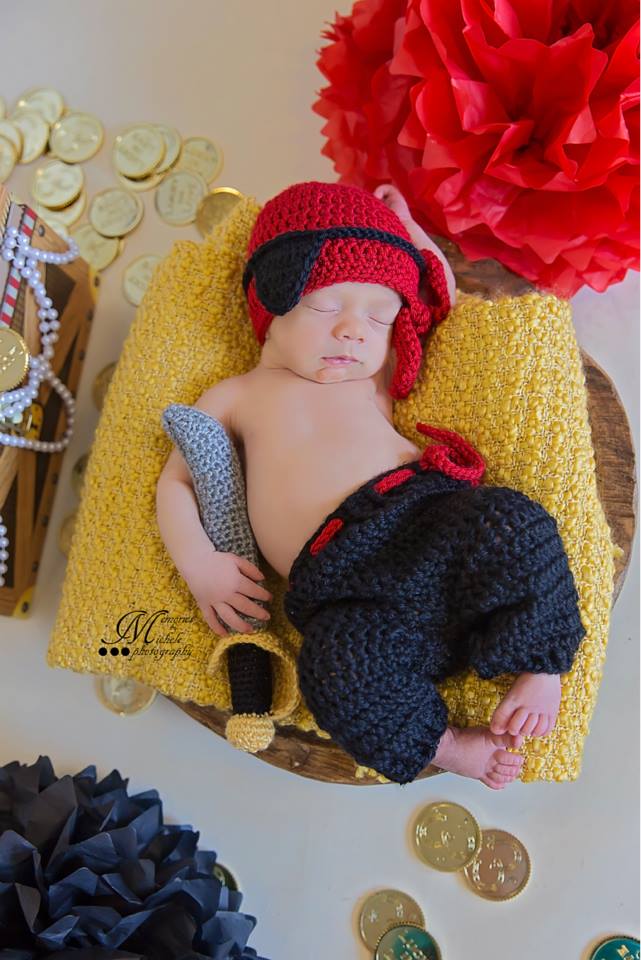
I receive a lot of questions about the sizing for my patterns, what age will it fit, and about how hard is it to adjust. As I just published my pirate outfit in multiple sizes, I thought now would be a good time to answer! First of all, there is no one size chart that will work for every child. All of my measurement are based off of averages (CDC website for head size), baby clothing (I have used Gerber pants to get estimates), diapers (they have weight for each size diaper), and just measuring babies that I have babysat and nanny for (of course, with permission from their parents). Yet, every child is still different and does not always fit into age and/or weight category. The absolute best thing you can do is get measurements of the child and adjust as necessary, which then leads to the question of how to adjust?